s

p

Easy art knock off

Hey hey! Happy Friday! I have a quick and easy knock off for you today! I’ve been thinking more about what I’ll be hanging on the walls in our master bedroom…after I finish painting all of them. Who knows how long that will be. Could be years. But whatever.

It’s the one room in our house with a TON of wall space – and it’s hard to figure out what to put everywhere. I struggle with making all the walls work together.

Lately I’ve seen a lot of this art at HomeGoods and it always catches my eye:

seashell shadow box seashell art

Over the past few months I’ve seen a bunch of these at two different locations and I love them. I picked up some coral art for the room at Target months back and these would look great with it. But I didn’t want to $40 on one, especially when I knew it would be so easy to recreate. :)

So that I did! I picked up a square frame at HG for $8:

The look was exactly the same, it’s just about eight inches smaller on each side.

I wanted to pull in some color so I cut navy blue scrapbook paper and taped it to the back of the mat:

I’ve had some shells for years that I knew would work in the middle. I tried out a few and liked both of these:

 DIY beachy artDIY shell art

But ended up with one a little simpler – a sweet little starfish. :)

I ended up spray painting the frame white, but then changed direction and threw some more color on there with a navy blue again. (I blogged about my blue spray paint taste test here.)

It was quick and easy and cost me $8. Not too shabby!:

DIY beachy art

Once I get the walls painted (a light gray) and get that small gallery wall going I think it will be a great little addition! My version doesn’t have the glass on top, but I have a plan in mind to make it look more like the inspiration art. (More of a shadow box look.)

I’ll let you know if it works when the wall is put together! First up…painting the room! Good times.

Have a great weekend my friends!

Spray paint blues

Hey hey! I have a little taste test for you today! OK, not taste – don’t eat the spray paint. But a comparison of sorts. I told you about the blue desk for my office earlier this week. The one that I didn’t like in it’s blue state, at least in that room. I actually did love it in a more saturated tone than it’s before color – sometimes I find a deeper color shows off the detail better.

One of you commented that the desk, that was supposed to be navy blue, looked more like cobalt blue (a brighter tone). I totally agree – I even noticed it when I was painting but was hoping it would look different out of the bright sunlight.

blue desk

It didn’t. :) Totally cobalt.

OK, here’s the thing – at first I tried the same navy blue on it that I used on my bedroom lamps:

navy blue lamp

And it was SO bright. It didn’t look like the same color in the least. I ended up using a different blue that looked a lot more navy, but when I compared the two inside they look like entirely different colors.

So I did a little test – first off, to show that the color on the cap of a spray paint can will sometimes look different than what you get when you spray. Secondly, a color in one spray paint will be different in another. I also noticed a big difference in coverage when I did this as well. 

I grabbed five blues out of my stash to do this little test and used some primed scrap wood:

spray paint comparison

So if you looked at this and looked at my lamps, I’m guessing you’d say the middle one is the paint I used, right?

Even I was surprised. I had to look back at my lamp post to see which one I used, and it was actually the blue second from the right:

blue spray paints

Who would’ve thunk it? Here’s the first thing I noticed when I did this -- I love the HUGE selection of colors that Krylon offers but the coverage isn’t great. I never really noticed till I did it right next to others but it sprays very thin and doesn’t cover nearly as well as the others.

I did two coats of each color and the Krylon colors dripped every time:

spray paint reviews

Due to it spraying so thin I think – it just didn’t cover well, at least compared to some others.

Here’s the other thing – the colors can look much different when you spray. The Stonewash Denim cap on the left has a blue gray tone to it but is straight gray when you spray it. It’s hard to tell in the pics because it actually matches the color of the cap better than some of the others. But I bought this a while back thinking it would have more of a blue tone like the cap and it doesn’t.

The Valspar on the right, called Deep Sea Diving, is another one that is different than the cap. The cap looks like more of a peacock blue color and it sprays a definite cobalt blue.

Here’s the other three close up – note that the one on the left and the one in the middle are both a glossy navy blue:

spray paint reviews

Can you believe the difference? At the risk of sounding like a Rustoleum commercial, it covered SO much better. (I did two coats of each color.) And to me it looks like a true navy blue, right? The Krylon in the middle is what I used on our lamps and I was actually quite surprised when I looked back and figured that out.

You can see where it dripped a ton too. It would take a good four coats to get good coverage on this white. But as I mentioned, I used it on our lamps and didn’t have any issues. And the navy blue on the lamps is a perfect navy to me, so it will just take more coats to get that true color.

But more coats means using more paint, so that’s something to consider. I used nearly two cans to do the desk and I imagine it would take double that to get good coverage with the Krylon.

The color on the end is one called Mountain View and I’ve used it on a few things over the years. The color on the cap is pretty true to the color. It’s a nice light blue that leans ever-so-slightly gray.

Here’s a close up of the board so you can see the coverage (I shook them all for a few minutes before spraying):

spray paint comparison

Again, as far as being true to the color on the cap, Rustoleum wins. Coverage-wise, Valspar and Rustoleum did well. But I’ve used the two Krylon colors at the bottom and had no complaints at the time – it was only when I sprayed next to others that I noticed how thin it sprays.

I know it’s impossible to match the color of the paint to the cap exactly, but many of the colors I’ve used are a pretty darn good match. What’s frustrating is if you get it home and spray and it’s not what you thought, you’re stuck with it. You can’t return it after you’ve used it. That’s how you build up a ridiculous spray paint collection. ;)

Do you have a brand of spray paint that you love? A color that is your go-to? Are you still afraid to spray? If so, check out this post for helpful tips!

Desk do over

Hello all! Hope your weekend and holiday was wonderful! Our Easter ended up being a lot more low key than we planned and it was great! My boy played outside pretty much all day long yesterday and it was fabulous – this is the weather we’ve been waiting for!

So the project I’m sharing today was frustrating – sometimes you put a lot of time into something and it ends up not working. Well, it may work great – but it just isn’t what you envisioned. It’ll make more sense in a bit. :)

I mentioned last week that I’d like a smaller desk in my office. We have a couple options in the house that I thought would work as a replacement – I tried the first and it was way too big (too long). The second was this small desk I got from HomeGoods years back:

decorative desk

In that spot it was mostly decorative – you can tell by the height of the chair that there wasn’t a lot of leg room there to sit. The desk was low and the middle section was in the way. I tried a couple different chairs and that one is actually the only one low enough for it – the desk just isn’t made to function I guess? (Which I didn’t realize till getting hit home and taking off all the tags, of course.) Weird.

So I pulled it into the office to see if I liked the size. It’s about half the width of my current table and I LOVED how it opened up the space. I actually placed it at an angle in the room and loved how it looked in there.

But as I mentioned, I couldn’t really sit at it. So I did some checking – first to see how much I would need to raise the desk to make it work for me. Then I looked at the legs closer and figured out that everything came off easily – the feet first, then the cross bars:
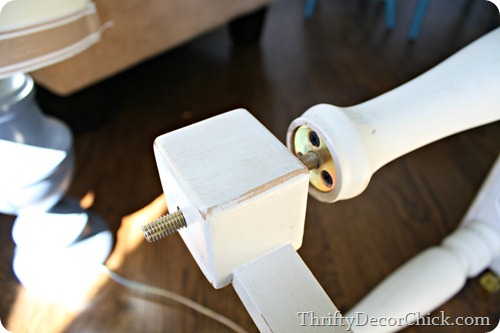
Then I was able to take the legs off as well. This was going so well! :)

I ran to the hardware store and grabbed a 2 1/2 by 2 1/2 board – when I got home I cut it down to size and installed it on the bottom of the desk:
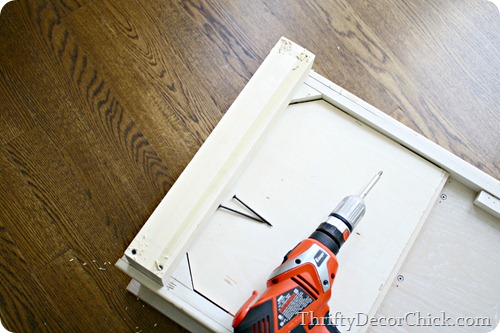
extending legs on desk

Then I reinstalled these little doodads that the legs screwed into:
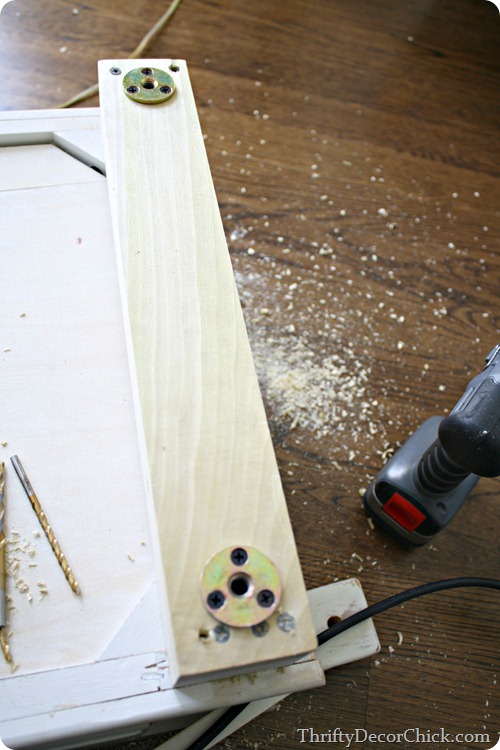
extending legs on desk

I was making a mess, as you can see. :)

So far so good – it was actually going fast and easy and I put the legs back on and the height was great!

Little issue. When I sit at my desk I rarely sit with two legs on the floor. I pull them up and tuck them under, or sit criss cross, whatever – I LOVE to have my legs up. Because of that I need extra space under the desk that normally wouldn’t be needed. My current table/desk works great because it has a small apron that doesn’t get in the way of my legs.

I tried sitting at the desk as it was but couldn’t handle not being able to pull my legs up. It’s my thing I guess. So…plan B happened. It got ugly before it got better:
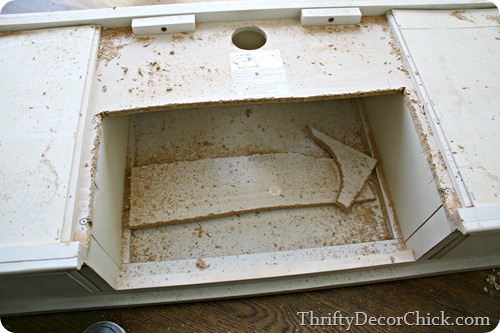
repurposing desk

I cut the middle section away with a jigsaw (it was just thin particle board) – not all the way back, but enough for my legs to be able to fit in. The photo above was a rough cut – I evened it all out and then used some small trim molding to cover up the rough edges.

It actually worked out great! I wanted to paint the desk anyway so these changes weren’t any big deal. The painting is where things went downhill. ;)

We took it outside so I could spray paint it – with all the detail on the legs and the grooves in the top I knew that would be the best option. I sanded it down lightly first, then spray primed it, then started painting the final color.

I loved my navy blue lamps in the master bedroom so much, I figured a navy blue desk would look great. My office is light but I thought having more of a statement in the desk would work.

It did not. :)

I didn’t even take pics of it in the room – we put it in there and I had to pull it back out immediately. HATED it. Don’t hate the desk, hate in in the room:
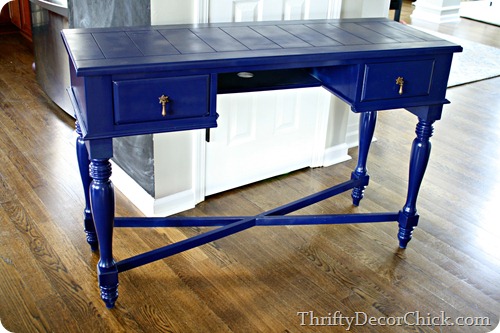
navy blue desk

Did I mention I ran to the hardware store ten minutes before closing to get more spray paint cause I ran out? And then the color didn’t even work. GAH. (I wasn’t 100 percent sold on it outside in the sun but thought it would look different inside.)

And the spray paint covered really crappy. It can get a cloudy look if you don’t apply it just so – this was user error though. When you’re painting smaller projects this won’t happen as badly because it’s easier to get good coverage. With larger furniture it’s hard to get it just right.

Thing is, both the new height and the cut out turned out great, and I love how the changes look!:
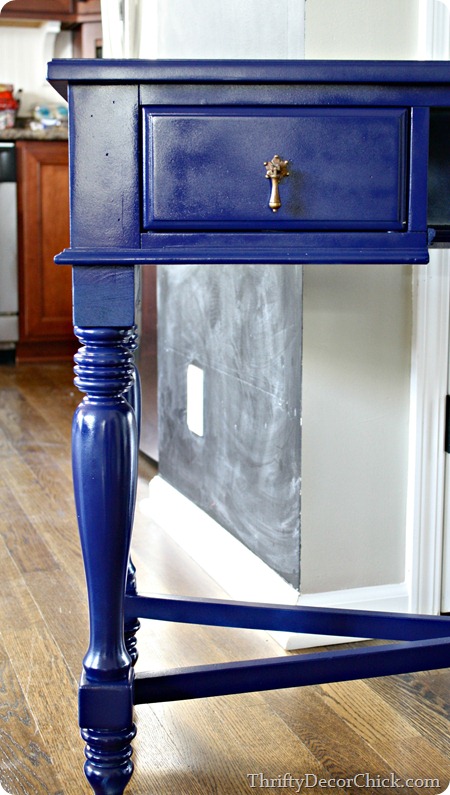
navy blue desk

The color is just all kinds of wrong. :) I actually like the navy on the desk, I just think it needs to be a deeper blue.

I’m determined to use it somewhere though – I have a couple spots in mind for it as is (I’ll touch up the uneven spray paint if it works). If I don’t like the blue I’ll be painting it, again. :)

One thing I’ve learned – I’ll need to stick with the table-as-desk idea, for the way I work…err, sit. I’ve been searching on Craigslist here and there for months and haven’t found anything that would work.

Something like this on a smaller scale would be ideal:
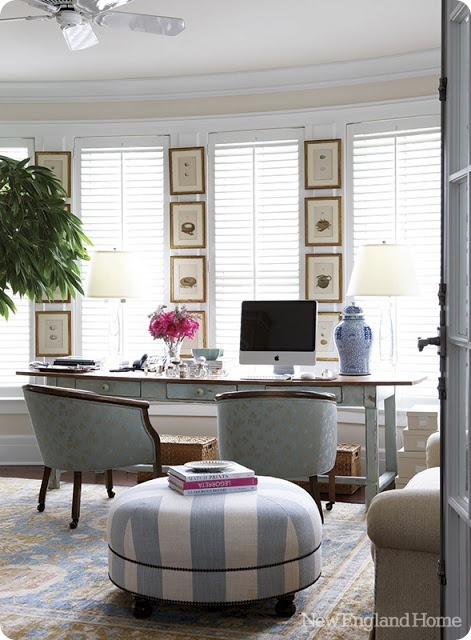
table as desk

I’ve been thinking lately I could just DIY something, since the size I want is so specific:
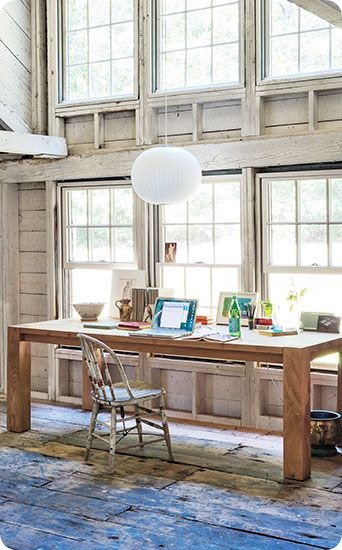
table as desk

(source)

And then I came across this small table from IKEA:
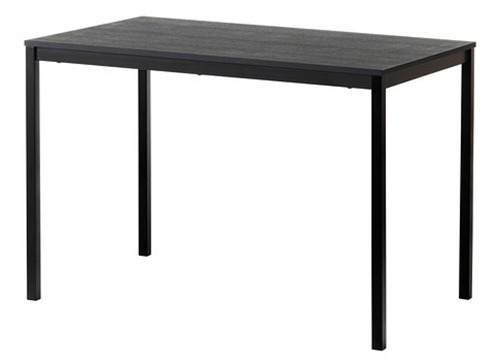
small table IKEA

It’s a little plain but only $40 and the perfect size. I think I’m leaning towards making something though. We will see!

All I know is the desk will NOT be navy blue. :) Live and learn. Most of the time I put into this project was spray painting – extending the legs only took about 30 minutes.

All in all not a complete waste, so I can’t be too bummed about it. For now I continue to sit at my gigantor table/desk in my office with my legs crossed. :)

Have you had any projects that didn’t turn out the way you envisioned? I happens to all of us at some point! Were you able to salvage it?

Updated 80’s light fixture

Hey hey! I’m back with a project that I let sit around for nearly two years. It’s been moved around the house – the garage for a while, then it’s future home (the dining room/library) for the past year or so. Just sitting there. For a year.

It was time. I found this light fixture at the Habitat Restore almost two years ago, even before I finished up the bookcases in the dining room:

painting brass light

It was $20 and I loved the shape so I snagged it up!

I think the main reason I let it sit so long was the work that I knew would go into transforming it. Meaning taping all that off to paint it. Bleh. Not fun.

I pulled out my rub n buff first, thinking I may be able to get away with no taping off and spray paint. But the dark color I had was dried as hard as a rock, I couldn’t get any out of the tube. Wah wahh. So I knew I’d have to spray paint it. I did consider just leaving it – the brass didn’t horrify me. :) But I wanted it to stand out more and I knew a darker color would make that happen. And the brass looked fine in some areas and horrible in others, so it needed to be covered.

It came apart into two pieces and I cleaned it well:

painting brass light fixture

This one helped:

Then it was time to tape all that off. I came up with an idea that helped though! I just laid the painter’s tape down over the glass and then used my razor to “cut out” each one:

taping off glass on light fixture taping off glass on light fixture

It worked GREAT. I timed myself and it took one hour and 15 minutes to tape off the whole thing:

taping off glass on light fixture

That’s 64 sections in one hour and fifteen minutes, so not too shabby! And when you’re sitting in front of the TV watching Flipping Out the whole time it’s really not too bad. :)

About half way through I realized the inside would still be brass, but you pick your battles. No way was I going to try to do the inside. So it’s still brass, but you can’t even tell.

I took it and the smaller pieces outside (YAY for spray paint weather!!) and primed them with black primer, then sprayed them in oil rubbed bronze spray paint (I’ve tried them all and all look great). Then I hung the light part in the garage and sprayed it the same way:

spray paiting a light fixture

Those white sleeves were brittle and falling apart so I just kept them on to protect the electrical stuff while I painted.

By the way, I don’t always prime my metal light fixtures – it’s not something that’s going to get wear and tear. But I was almost out of my ORB spray paint so I wanted to make sure it had a dark base.

When the parts were dry to the touch (about an hour later), I installed it inside:

painted 80's brass light fixture

The chandelier we’ve had in here has looked odd to me since we started the transition to a library instead of a dining room. (Read more about that here.) Our old kitchen table still sits in here, only because we haven’t made the new furniture a priority. (Four matching chairs isn’t going to be cheap!)

Anyway, the old light was too detailed for this space and I wanted something a bit simpler. I think the darker paint makes this light look a million times better!:

DIY bookcases

Eventually I may get something else (I’ve had my eye on another light for a long time now) but for now the $20 one that’s been laying around for years works GREAT. :) I won’t do anything until we get the furniture for this space anyway.

Part of the reason I finally got this done is because I’ve been wanting to move the chandelier that was in dining room to the bedroom:

pottery barn light from home depot

I’ve had another Habitat light up there for years but I wasn’t loving it anymore – and it was just a place holder till I could get a chandelier in there. :) This worked out perfectly!

The chandelier was from Home Depot and I got it because it was so similar to the Pottery Barn version, for about $200 less:

img73c 5450f114-4a75-4e08-a540-aa5969a5cf1b_300

(PB: source, HD: source)

I LOVE this light! It is gorgeous in the master bedroom:

chandelier in bedroom I’ve been planning to use this one in there since I finished up the bookcases in the library, so it’s nice to finally get it installed!

So there you go – a $20 light, spray paint season is BACK and a little light switcharoo! I feel like I got two lights for less than $25 – I had to get new white sleeves for the dining room light so that added a few bucks. And when you buy the light two years ago, does that even count? :)

Have you spray painted a light fixture lately? It’s amazing what paint will do to help update them!

Spray painted door knobs – the result

Helloooooo. WHOOT for Friday! I’ve got a fun weekend planned and I’m stoked about it. The weather is supposed to stink so I’m crossing my fingers that everything goes as planned.

I wanted to do a quick update on the door knobs I spray painted a few months ago. I’m pretty sure I did this back in October – I shared how I did it here but the gist of it is that I primed the knobs with spray primer then did a couple coats of oil rubbed bronze spray paint:

spray painting door knobs

They looked great! This one was on the back door that we’ve since replaced, but I also did the knob on our mud room door and the result…well, it isn’t good. :)

Pretty much immediately we noticed the keyhole area was going to be an issue (which didn’t surprise me at all) and it went downhill fast:

spray painting door knobs

But honestly most of the wear is just from our hands, which did surprise me. The area around the edge of the knob is totally worn:

spray painting door knobs

OK, what’s interesting is I swear I primed both of these with black primer, at least I’m pretty sure I did? Maybe I did one with white? I don’t know because the worn parts are white. (Yes, I did start using white on one of them. The primer I love to hate.) So, if you do try this at home maybe use black primer only, that might help. 

The inside of the door where there’s no keyhole has faired a bit better – the edges aren’t as worn but the lock is:

spray painting door knobs

This is after three months of use and honestly it started wearing off almost immediately – I’d say within a couple weeks. So, ultimately I didn’t have great success with it. This knob is staying till I want to spend on a new one because it’s functioning just fine.

Things that may help – sanding them down will help the spray paint adhesion. I didn’t try that cause I thought it would be a pain, but honestly just sanding the edges may help. Also, I didn’t do a clear coat to protect it when I was done. I’ve never done that on anything I’ve spray painted and it’s held up fine, but not much gets this kind of use. That may help (but I still think that would wear off after awhile too.)

So there are the results of my spray paint experiment. :) I know some of you have painted your door knobs – did it work for you? If so what did you do differently?

Have a GREAT weekend!!

One dolla

Holla! Sooo…the dollar spot at Target. The place dreams are made of, yes? Pure brilliance – all that cheap inexpensive goodness right there when you walk in the doors? I stop by “real quick” every time and walk away with $10 worth of stuff…every. time.

I made over a little find recently and it’s just a good reminder to look at things that you may not completely love and imagine them with a new color. Spray paint is KING. It will rock your world. This may be the quickest redo ever here on TDC but I love sharing quick and easy. :)

Over the years I’ve found all kinds of goodies in the dollar spot – they have GREAT little scrapbooking stuff that I have to pick up because I’m a non-scrapbooker who loves scrapbooking stuff. I also get these plastic folders every year because I just cannot resist them:

plastic folder Target

Right around Christmas they had a TON of cute office supplies:

Target dollar spot

Who DOESN’T need sparkly clips, I ask you?

This is one of my favorite recent finds – I use it ALL the time:

easy strainer

It’s a strainer – I use it for meats in the skillet and pasta in the saucepan. It’s really strong and so much easier to use than the flimsy metal ones we have. And super easy to clean. LOVE it.

I came across this little tray a week or two ago and figured it would look great with a little spray paint:

target dollar spot tray

I cleaned it off and took off the tag, which took forever, then primed it (all I had was black) and then finished it off in gold spray paint:

gold spray paint

Super quick, super easy! SUPER cheap.

I almost did navy blue but I didn’t want it to match with my blue lamp on my nightstand exactly:

dollar spot tray spray painted

And I may have squealed a little bit when I saw it with the carafe (also from Target last year). They are perfect together. The carafe makes me feel SO fancy, let me tell you. I use it when I wake up hacking in the middle of the night, terrified that I just swallowed a bug or something. Fancy

Most of the time the tray holds my phone, or little things like my hair clips that usually get lost. (Read: things cats think are toys.):

gold spray paint on plastic tray

So far it’s holding up fine but I may put a clear coat on it to help protect it.

Not bad for one buck and less than ten minutes, right? Who doesn’t need a little bling in their lives? And it took me longer to get the plastic sticker off than it did to give it a redo, no lie.

I don’t like a lot of decorative stuff on my nightstands, do you? We clutter them up enough on my own. Now maybe I’ll just clutter up the little tray instead of the whole thing:

target tray spray painted We’ll see about that.

What’s your favorite dollar spot find? Is it your favorite place too?

Spray painting door knobs

Hey hey all! Well thank you for the kind words yesterday! :) We are very excited.

I’m back with a DIY project I’ve been wanting to tackle for a long time. I mentioned a while back that my house had been finally been debrassified, but I was wrong. I had forgotten about a couple knobs in the house. Drats.

But these were exterior door knobs that we use a key with – so replacing them meant two things: lots of $$ and since they are keyed don’t you have to make new keys when you install them? I always thought you did but maybe not. But still, lots of moola to replace two of them.

I didn’t feel like spending lots of moola so I figured I’d try out a DIY to change them up. I’ve always wondered how spray painted knobs hold up and it’s the age old question – some say they do great, some say they do horribly.

We’re about to find out. Well…in a few weeks/months anyway.

I did a couple doors with varying uses/elements so it will be interesting to see how they turn out. But first, the how to.

You take the offensive shiny thing off:

spray painting brass knobs

Ignore the horrible, dirty mud room door. And missing trim. And blinding brass.

Don’t be afraid to take the knob off – even I avoided this for years and it’s not a big deal. It's two pieces and the screws, that’s it. Just remember how they go back together and always remember the access to the screws side goes inside the room!

First up, and I think this is most important part – clean them. I just used my basic cleaning stuff but anything that will get any grime or grease off is what you want:

spray painting brass knobs

Thing is, if you don’t clean them well the primer and paint won’t hold well – you’ll get crackles (the dreaded crackle, shakes fist in air!!!!) or it will easily wear off those dirty areas.

I took them out in the garage and needed something that would allow them to stand up, so I stuck the one with the long part into a shop towel cardboard box and just laid the other one on top:

spray painting brass knobs

I later stuck the screws in there too – they stand up straight so you can spray all sides at once.

So…the primer part. Well. I have some really good (and expensive stuff) called BIN primer in a spray. But it’s a pain in the butt. I told you more about it here. I’ve tried everything to make it spray smoother but it just doesn’t work. This time my gloves and the can ended up covered in the primer:

spray primer spray primer

SO frustrating. The paint sprayed all clumpy and gross too, so I actually had to sand down the knobs a bit to help that. I’m throwing the primer out, which is annoying cause it’s not cheap.

Anyway…I ended up just using a basic black primer instead:

spray painting brass knobs

The BIN stuff is stronger, better primer, but I was tired of cussing so there you go.

Don’t they already look so much better though? SO. much. better.

I finished up with my BFF…good old ORB (that’s oil rubbed bronze for those not tight with it):

oil rubbed bronze spray paint

Hello my friend. Good to see you again.

When spray painting remember short, light coats – not long, heavy ones. There’s really not much to it if you remember that.

I took the knob off the back door too and you can see the wear on the keyed side from being outside:

spray painting brass knobs

So it will be interesting to see how these hold up – the mud room door is one we use a key on all the time, so that will get lots of wear and tear. The back door we don’t use a key on much, but the outside part gets hit with the elements. And we use both doors numerous times a day.

On the back door I took the knob off and did that first: spray painting door knobs

I didn’t want to take both off just in case something went wrong. You know I don’t have much luck with that door.

The deadbolt part was a little more tricky – we’ve been told we need to replace our whole back door (water issues) and every time I get inside there I see why. The insides of that one were rusted so it was hard to get the lock part off the outside part of the door. I just ended up spray painting the inside part.

I also took the strike plate off and sprayed that, but I know it will get scratched up – it already is. Most of it should stay the ORB color though, so we’ll see how that holds up:

spray painting door knobs

I decided to makeover that mud room door so I can’t show you the after on that one just yet. ;) But here’s how it looks on the back door:

spray painting door knobs

So here’s the thing about painting doors – this is why you really want to take the knob off before you paint. I didn’t and now the knob isn’t exactly where it used to be and you can tell. :)

I can’t wait to show you how it looks on the mud room door! LOVE how the room is coming together! There’s a long way to go but I think it’s going to be fun.

I’ll update you in a month or two and let you know how these are holding up! I’m really interested to see. Our coach lights that I spray painted still look fantastic: spray painting outdoor lights

They are exposed to the elements for sure, but no one handles them.

Have you ever tried spray painting door knobs? How did it turn out for you? I’d love to hear! I love a good experiment. :)