s

p

The fireplace design

Hello everybody! I’m back home sweet home after being away in Atlanta last week. Another successful Haven Conference is in the books!! Thanks to all of you who attended and all of our vendors and sponsors who help to make it a success! Every year I leave feeling so humbled and blessed. I came home and crashed hard – and then my boy got sick so we’re still nursing his bug. Back to normal! :)

Today I’m sharing the process I went through to decide on our new fireplace design. THIS is the fun part for sure. Usually I’d spend months pouring over photos to figure out exactly what I wanted, but this time I had to hurry it up a bit. The fireplace happened a lot faster than I thought it would because we had to have that figured out to move the gas line and lights.

Thankfully that built was the majority of the cost in this project – from here on out it’s not too bad. And even though I had to hurry up my normal process, I’ve known what my “dream” fireplace looks like for years anyway. ;) I just wanted to find some pics to show the guys.

There were a couple things I was considering to change up the look even more. I love the look of a grand fireplace and as I was looking through inspiration photos I noticed that the ones that really struck me had two things – a hearth of some kind and they were raised up off the floor a bit.

Our fp has always been down to the floor and has never had a hearth:

mantel-christmas

I’ve always thought raising up the box and adding a hearth would make it feel grander, but I wasn’t sure I’d be able to do either one. I started doing some research to see if it was something I REALLY wanted to make happen.

This was my original inspiration:

raised fireplace on hearth

It had both – the fireplace itself was raised up a bit and there was a flat hearth. I’ve always thought both things make it feel more substantial.

But then the more I looked at photos, the more I realized most of the ones I was drawn to may have have had one of those features, but rarely both. Kelly’s gorgeous fireplace had a hearth but the actual fireplace was to the ground (because it’s wood burning):

woodburning fireplace, hearth

(source)

Layla’s beautiful fireplace redo had a simple black hearth and another fireplace that was low to the ground:

lettered cottage fireplace redo (source)

Again, their’s was low because there was a cast iron firebox inside initially, but I did like the look.

I finally found a gas insert that had a small hearth and was down low too:

TV over fireplace

(source)

The more I looked the more I realized maybe a raised insert and big hearth wasn’t the look I was going for. ;) And then as things started to come together I noticed that adding a tiled hearth was going to eat into our family room space even more. I’ve mentioned that the new room will be much bigger, but it will be long and skinny. That width the hearth would take up is valuable space.

And I looked into raising the gas insert but there were two issues – the venting in the back would have to be replaced and it would mean the whole thing would stick out even more. I mean, it’s already a beast. And we’re moving our TV over the fireplace so even another four to five inches in height would make our TV really high. As it is now I think it will be great, but any more and it would be awkward.

So after a little more research I decided to nix both. The added cost and problems weren’t worth it. I felt a ton better about that decision after seeing this gorgeous fireplace redo:

TV over fireplace

(source)

No hearth and the insert is to the ground – and it’s beautiful.

And when I found this one I saved it to my files and named it “exactly.”:

TV inset over fireplace, no hearth

(source)

This is actually very similar to how ours will look, at least the fireplace and wall part above. I’ve been planning to “sink” the TV in just a bit and this gave me a good idea of how it will look. My plan is that you won’t see that inset part though – the bracket will go inside and the TV will sit over it:

inset for TV bracket

As a reminder, here’s my inspiration for the look of the built ins and fireplace set up:

fireplace with built ins

And this is what they had done as of early last week:

fireplace with built ins

Lots of progress has happened since!

This week I’ll start caulking, filling and priming the entire thing. I still have to figure out what tile I want to use on the surround:

Those are just a few options – the first and third from the left are my favorites but that herringbone looks hard to install – lots of little bitty cuts that I’m not sure I want to attempt. It would look AMAZING though, right?

Anyway, I hope by the end of this week I’ll have the whole thing at least primed. Can’t wait to show you the progress! We’re almost to the point where it’s all up to me – the guys are finishing up the fireplace details today, working on the lighting in the room and then the audio/visual guys are coming to move everything. I’m a little nervous about that – hope it all goes smoothly. Then the floors can be patched and I can get moving on the walls and paint.

So far so good – I’m doing OK with the mess so far. Since there’s not really much left for the contractors to do I can see the light. :) I think we’ll only have another week or so of construction and then the smaller stuff starts.

Do you have a dream fireplace in your head? I’m so excited I get to see mine come to life!!

Tearing down a wall!

HELLO everybody! I’m back with an update on the wall demolition progress. Otherwise known as “BEST. DAY. EVER.”

I’ll go through the steps and also a few of our plans – keep in mind that we are still early in this process when you see the pics. :)

We started bright and early last Wednesday – I started scoring and taking down the boards on the office side of the wall so I can reuse them later:

removing wall trim

More on where I’m using them in a bit. :)

It was quite a treat to take them down and not worry one bit about the drywall damage:

removing wall trim

Side note – I didn’t use glue to put these up but it seems caulk acts exactly like glue when it seeps under the boards. Good to know.

On the other side of the wall the trim was being taken down as well – I saved about 90 percent of it for possible use in other spots:

prepping to remove a wall

Early on the guys mentioned that they don’t take down walls like you see on TV – hammers flying, kicking in drywall. I was all, DANG! I was looking forward to that part.

So they let me have at it. I laughed out loud when I saw my face in this picture:

taking down a wall

I forgot my protective eyewear, I know I know. I remembered later.

Think this made me happy?:

pure joy

They had me slow my roll a bit when they realized the drywall was shooting all the way across my office – I was having fun.

I tore down some of the drywall (while my sister and I marveled at how very little is really holding our houses together) and then stepped back and watched as the light started pouring into the family room:

removing interior wall

I actually watched a few YouTube videos on how to take down a wall the night before and I was happy (but not surprised) to see that the guys followed all the precautions mentioned in those videos. Things like moving boards with nails out of the way as you go, hammering down any nails sticking out of the studs so they aren’t a hazard and little tricks like tilting the outlets face up. That’s so when you pull the drywall out it doesn’t rip the wiring out along with it.

By the way – we turned off the gas to the fireplace and all electrical in this wall before doing a thing. Very, very, very important.

Tearing down the drywall was cool but knocking out the studs was way more fun. It’s not hard (again, surprisingly so). I mean, it definitely takes some force, but that was my favorite part for sure:

tearing out studs

Those outlets you see were cut before we took out any studs so there was no need to take them off first.

A few whacks and it was out – then you just pull and rock the wood so the nails out:

how to tear down a wall

I liked it so much I ended up taking out all the studs. ;)

One more BIG thing – I knew from my own research that this wasn’t a load bearing wall for a few reasons. One, it was a partial wall that didn’t end with a large post. I could tell by using my stud finder that the end of the wall was just a few studs and not four or five next to each other. If you have that many it’s probably a support for a beam in the wall/ceiling.

Also, I know which way our beams go in the ceiling because of how our hardwoods were installed upstairs – the flooring needs to be nailed into them so it’s installed perpendicular to them, not parallel.

Because I knew the direction of the beams in the ceiling, I knew the wall wasn’t load bearing – if your wall is perpendicular to your beams it’s probably load bearing, if the wall is parallel with your beams it’s most likely not. Hope that makes sense!!

Anyway, within a few hours everything was out and taken away. The debris overflowed the back of their huge pickup truck – I was shocked at how much was on that little wall so you’d need a small dumpster or truck if you try this even with a small wall.

Of course it went fast because they had so much help:

Always.

So when you take down a wall you’re never 100 percent sure what’s inside. I knew we had a cable, two outlets and a gas line. I wasn’t expecting the extra cable and speaker wires:

how to remove an interior wall

Those hung like that for about a week till the audio guy could come out today. They operate our sound system and cable in the family room so he rerouted it all through the ceiling and wall so it can be used when the TV is moved. Still some work to be done to pull everything over from where it is on the other wall – I’ll probably make the whole TV placement a post of it’s own. :)

So far we’ve been really lucky with each trade coming in to do these separate things in a timely manner. I SO appreciate that. Also – I didn’t realize it but you call a plumber to move a gas line – who knew? Not me obviously. :) The same guys that did this also ran our gas line for the basement dryer years ago. They do a great job so if any locals need a name just email me.

I wasn’t planning on the fireplace happening this early but the surround had to be built up in order to move the gas line. I shared my inspiration pics and the guys started building it yesterday. Because we have a direct vent gas fireplace we kept it right where it was, keeping the same vent. No new cuts on the outside of the house. Problem is, the fireplace box is about 16 inches deep, plus some room for the vent and you get a very deep fireplace. Most homes that are built with a similar fp have a “doghouse” extension built so the back of the unit can stick outside a bit. But to do that would mean cutting a hole in the house and getting permits and ain’t nobody got time for that. :)

We were prepared for that though so this baby is deep! But by the time we’re done it won’t look quite as deep: cabinets next to fireplace for electronics

Here’s my inspiration pic to give you an idea of how this area will kinda sorta look eventually. Fingers crossed:

(source)

I was planning glass fronts on the cabinets to the side (I’m looking into different doors that I will have glass installed in), but I figure the TV components will need to breathe. So either we’ll figure out something to vent them on top of the cabinets or I’ll use radiator grates instead of glass.

I think I’m most thrilled with the fact that this is now a standard sized, wide fireplace – I haven’t had one this big in our family room yet. :)

Lots of room for trim and tile!:

fireplace that sticks out from wall

Even thought the fireplace comes out into the room quite a bit (which I knew before we started), I think the depth will actually be one of my favorite things about it. We’re adding a wall that will be at least three inches deep above it that will reduce the thickness just a bit – I think it will work out beautifully when all is said and done.

SO many things to figure out still!

Here’s the room as it is now:

tearing down a wall to create great room

The desk will be gone, the dresser will move and I have a plan for that side of the room but will have to see how it all comes together. The rug width and length will have to be cut down (or I’ll have to find a new one, but I really love this one) so it doesn’t sit right in front of the fireplace.

The board and batten will continue throughout the whole space and french doors will go where the double windows are to the right of the fireplace. Thing is, this new room is MUCH more spacious, but it will be long and skinny. So the sectional/fp area will be cozy, but we knew that going in. It’s totally worth it with all the extra light!!:

deep fireplaceThere will be a walkway behind the sofa that feels a tiny bit tight now, but that’s mostly because we’re just not used to it. I’m moving some furniture around that will help to open up that area quite a bit too. All these ideas make me giddy. It’s Christmas in July people! For real…this is my Christmas present. ;)

And moving this all down into the old office makes everything SO much more open down by the kitchen, I cannot even tell you. It feels AMAZING. Ack! More on that later too. :)

I’ve been told to plan for extra costs that pop up during a reno and it’s already happening. :) Since the ceiling it already opened up we’re taking this opportunity to add recessed lights throughout the whole space. Hallelujah! There’s no overhead light in my office so it’s needed. I’m thinking of removing the hanging light in the family room for a cleaner look – if I keep it will be moved to the center of the room.

Next, the guys will finish up the fireplace build this week and then start on the lighting. The sound system stuff will be moved and then LOTS of drywall patching, mostly in the ceiling. After that I’ll have the floors patched – and then comes the new doors, installing a TON of trim on the walls (board and batten, base and crown) and painting the entire space – the last two jobs I’ll be doing myself.

Whew! There you go – the progress and the plan! I’m so happy with it so far. I can see the finished result in my head and in there it looks pretty awesome. :) Are you seeing my vision?

Today is the day!

It’s happening. I was just telling a friend the other day that I will mull over a project idea for months and months and then will “go” at the drop of a hat. Today I’m doing exactly that. :) We’re tearing down a wall!

The handymen we use for stuff occasionally texted me earlier this week to see if I needed anything done because their job was canceled this week.

Why yes, yes I do.

They came over yesterday and gave me a quote and should be here within the hour to start tearing down the wall.

DUDE. I am so excited and terrified all at once. I’ve never done anything quite this major! I could barely fall asleep last night, I was so giddy.

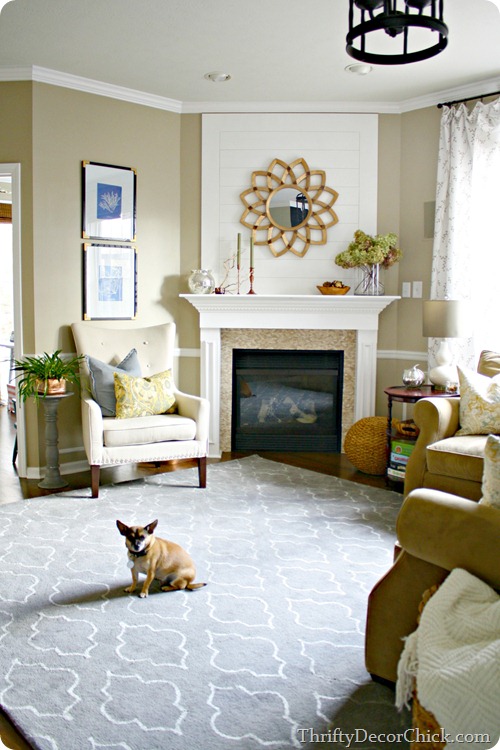
As a refresher, the wall to the left of this photo is coming down:

corner fireplace design

It separates the family room from my office. For reasons I mentioned here we are tearing down the wall and I’m GIDDY. The fireplace will move too. Funny, when a reader suggested this idea my initial thought was, there would be no spot for the fireplace. And then someone else mentioned, uhhhh, on the back wall would work. Duh. But EVERY person I talk about this with wonders the same thing – where in the world will you put the fireplace?

It will be in the same area, just flat against the wall. Flat people. Am I in heaven? It will be much wider in it’s new home too, and I plan to add a tile hearth. Glorious.

Here’s the rough floor plan as it is now:

familyroomplan

Ignore that 1/3 to the right, that’s all kitchen.

Here’s what we are planning over time:

familyroomplan

I have decided to do this in (short) phases over what I’m hoping will be the next six weeks or so. Well, all but the extension.

First phase is taking down the wall, patching drywall and electrical. The lights above the fireplace need to be moved and the main light in the family room needs to be moved over.

We’re hoping to have that done by this weekend. We’ll see. :)

I say “we” because I am helping – it’s always been a dream of mine to knock down a wall. Dreams do come true people, they really do.

I considered trying this by myself but we have electrical and a gas line to figure out – I know my limitations so I’m getting help.

For now we will place the gas insert up against the wall so I can finalize the mantel design. I need time to ruminate over things too – that’s why I’ll do this in stages. Oh yeah, and the budget.

I’m still a little nervous about the furniture placement. We searched high and low for a “small” sectional years ago and it’s still basically six by eight feet:

familyroomplan

A beast. That’s another reason I’m going to let the fireplace just sit for a while – I need to decide the room/TV set up before we move any sound system stuff.

The next phase will be replacing our double windows in there with french doors. We’ll have to special order them anyway. I was initially planning to add another window off to the left of the space (where there’s already one now) – I was just thinking it would balance out the french doors. But now I’m thinking the one window is fine. I want plenty of space for the fireplace and built ins.

One of the biggest issues has been fixing the hardwoods. I had our flooring guy come by to take a look and he’ll be able to feather them in, but he’ll sand down quite a bit of the floors in the family room, kitchen and office and restain to make sure they are seamless. The price is great too – I was nervous about that part, but so far (crossing fingers) this will be a MUCH more affordable way for us to gain some living space.

Whew. OK, I gotta go move some furniture! So nervous, so excited!! Whoot! I’ll share progress as soon as I can! (If you follow me on Instagram I’ll probably update on this project while it happens.)

To see more of how our family room looks now, check it out here. (And you can see how we’ve tried to make it’s awkward layout work over the years.)

Dream project, plan B

OK, so I’m back with an update on our dream plan I wrote about a few weeks back. We had big dreams people. Dreams of extending the back of our house, moving some things around and creating more space where we want it – in the family room and kitchen.

And then we got quotes. First, I need to send out a double chest thump to the contractors who actually called me back. Guess what? It’s rare that a contractor calls you back. Who would’ve thought?

I called about ten businesses, two I talked on the phone and they were great. Most never called back. I only had two actually come out and to give us a firm quote, and of those two only one gave us a true, hard quote on a piece of paper. I’m already discouraged by this process. :)

I understand many charge for the estimate process and I totally understand that and was willing to pay – but out of ten I got one real quote. Thing is, they were all high. Like, CRAZY, you-are-freakin-kidding-me high. As I mentioned, we’ve had friends locally who have added on similar square footage and the price was much more manageable. Of course the contractors they used are no longer doing it. :)

We did have a few different roof lines to work into the plan, which increased the price. And running HVAC gets expensive too but our friends did that as well, so who knows.

ANYWAY. We could have done it – but at the prices we were quoted it just wasn’t a good use of our money. I’m willing to put some money into this, especially since we plan on being here so long. But it just wouldn’t have made sense to spend that much on this house.

So, plan B. :) I told you I wouldn’t give up.

Here’s the family room and kitchen plan I’ve shown you before:

To see our original plan go to this post. It involved pushing out the kitchen and family room quite a bit.

A couple of you mentioned an alternative in the comments and it has crossed my mind briefly over the years – I just didn’t think it would work. The idea was to take down the wall between my office and the family room. The wall to the right: board and batten walls

At first I discarded the idea because I truly do use my office, every day. I do want a space. But a reader suggested the loft and duh, that would work just fine. It would take some getting used to and I like being our main level – but by the time I finished putting things on paper I realized I’d probably have room for a desk in the new family room plan.

The thing is, I took down the doors to my office years ago – so it’s already open to the family room. When I really started thinking about it I realized how the two spaces are practically one anyway. I watch the TV in the family room from my desk:

TV above dresser

Hello Charles. :)

And honestly, the more I thought about it, the more I loved the idea. And I think I would keep the board and batten look throughout the space, because taking all that down would just make me cry a little. I have a plan to just change it up a tad.

I contacted two realtor friends of mine and asked them if it was a good idea. I didn’t know if losing the office would be a bad thing -- I wasn’t going to consider anything that would hurt the value of our home. I sent them photos and both were totally excited about it and said it looked like a great idea.

Whew! So now, I have a new plan. Here’s the current look, as a refresher:

floor plan

The family room and kitchen table area are the ones that are tightest for us.

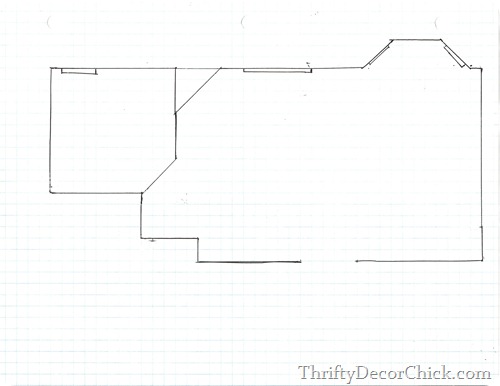
Because sometimes I just like to look at things on paper, here’s my rough sketch on graph paper, with the office included on the left:

It’s not totally to scale (but close!) and I forgot to add in a couple current windows, but you get the idea. The triangle in the corner of the family room is our fireplace and the open area on the right is the kitchen that will mostly stay put. 

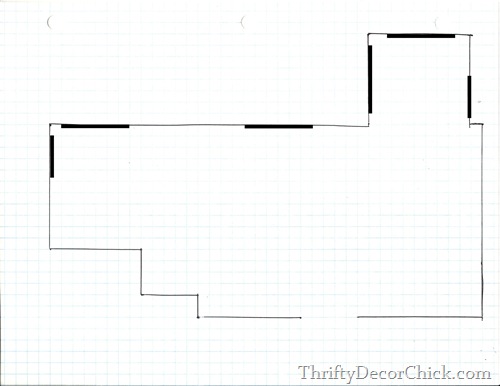
Here’s the new plan:

Now there’s still an extension, but it’s much smaller and it’s just the kitchen. The bay window would be knocked out about six more feet. Eventually there would be a banquet there with the table.

I’d work with the windows that we already have in the family room and make those into French doors with access to the deck. Minimal messing with the current wall should cut down costs significantly.

Here’s an idea of the floor plan with furniture:

That table area in the kitchen is not final by any means – I’m still considering where I’d put the door, the table set up, etc. I need to make sure we’d have room to move around there. The space would be about 90 square feet, 60 of that new.

The fireplace would move to the back wall of the house. It’s a direct vent and I don’t even think we’d have to move the vent on the back of the house. My thought is to add another window in the corner to make that a double window to balance out the French doors.

The furniture layout would change significantly – and to do this I’d have to move our TV above the fireplace, which I’ve never wanted to do. But it may be the best/only option. I’d love to do some kind of small built ins next the fireplace to hold TV components. The placement of things is a little hard still because the office is only about ten feet deep – so I need to make sure we could place things well and still have plenty of space to walk around: 

It kills me that we shopped forever for a smaller sectional and that thing is still a beast! :)

I’m going to tape off shapes on the floor to see how it will work for sure. I have to say, I’m TOTALLY excited about how this could work. It would make our family room so much bigger and completely change the feel of it. And my office gets GREAT natural light so the thought of all of that in the family room makes me giddy.

The wall that would come down is not load bearing and I actually am considering taking that down on my own. :) I’m STOKED at the thought of that. The gas for the fireplace is in that wall so I’d need to have that moved. I’ve contacted our flooring guy and he says he can patch the floors just fine.

I think I could act as the contractor for that part of this job like I did for the basement. I’d need to coordinate the gas line, the fireplace rebuilding, some electrical work, adding the doors and windows, flooring fixes and a LOT of drywall.

So. That’s the new plan. I’ve already contacted the contractor who actually responded to me, so I’m hoping to get a new quote soon. And I’m going to call a couple more one more time – if you are in the Indy area let me know if you’ve used anyone you liked!

Do you have a TV above the fireplace? Have you ever taken down a wall in your home? Is it as thrilling as I imagine it? ;)

Our dream project

Hey hey! Well, it’s dream time. Dream being the key word, as we look into this further. ;) But it’s fun to think about and I love reading stuff like this so I wanted to share. 

Our house is a great size. Not massive, but plenty big for us. I mentioned in this post about building our house that we often wish we had more space in the areas we use most. Those areas being the family room and kitchen – everywhere else we are golden.

I’ve had this idea in my head for years now. Probably five at least – at first it was just daydreaming (back in the days when we were drowning in $125K in debt). Over the past couple of years I’ve considered it even more – but we’ve never acted on it. Of course over time I had to kind of introduce the idea to my husband – sly-like so he wouldn’t freak out. ;)

But he was actually quite into the idea and goodness, that gets me in trouble. When he’s on board I’m full steam ahead.

So years ago I shared a floor plan of our kitchen and family room – I don’t share many other floor plans of the house for security reasons. It kind of weirds me out you know? But this space has always been one we’ve struggled with, so back when we were buying our sectional I shared this:

The family room isn’t a bad size at all, especially since we moved the TV to the wall on the bottom. Makes a HUGE difference:corner fireplace

But the windows and that corner (curses!!) fireplace make it so that this is genuinely the only way to set up the room and have it function. Over the years I’ve found myself thinking if we only had a few more feet…it would make a huge difference.

The table area in the kitchen is tight. It’s a little better since I changed out the tables from a round to a rectangle, but if the chairs are pulled out you can’t walk around the table or get out the back door. It’s just tight. I am SO thankful we had the bay window put in!

We love to entertain but the longer we’ve lived here the less we’ve done of it because the space is just not conducive to having a lot of people comfortably. (We do use the patio a lot!) But it’s not really even about that – we just wanting a little more space to live. My boy is getting bigger and as our family grows (grandson and six siblings getting married and having kids) we’d love to be the hub for family events.

So. A plan was created in my head. One night I finally went out with a measuring tape and starting figuring it all out:

Sigh. It looks so simple here – if only that was the case. :)

That area in the white is all deck. We want to bump out the kitchen area about six feet. My dream project within this dream project? This:

banquet seating kitchen

(source)

It would go perfectly in that spot and would look just. like. this. :)

The middle part would be an extension of the family room with lots of windows. I originally planned to maybe move the fireplace to the end of that space like this:

fireplace in sunroom

It was actually this photo that I found a few months back that made the hubby say “Let’s do it.”:

fireplace between windows

Those are magical words.

But since then, after talking with a few people and considering the flow outside, I’ve changed my mind on that. The fireplace would stay on the wall it’s currently on and would direct vent out the roof. But no. more. corner. fireplace. I wasn’t crazy about the idea of a huge long wall with nothing on it – it needs something to ground it and we would need an easy way to get to the patio.

I do want the pitched roof though. Perhaps with faux wood beams down the line or beadboard:

beadboard ceiling

(source)

And lots and lots of windows like my friend Julia has in her sunroom:

big windows sunroom

(source)

Hers are extra big – I love them. We would stick with the standard windows we have in the house but I’d want a lot of them.

It looks amazing right? It’s all planned out in my head. What I didn’t have planned was the cost – I had a number in my head and so far it’s been blown out of the water. Like, torpedoed. :)

A friend added on a large sunroom/family room a few years back (actually more square feet than this would be) and it was totally reasonable as far as cost. Same pitched roof, lots of windows. But so far the numbers we’re getting (very rough) are triple that. Whut?

The large numbers are coming from rough estimates over the phone though – we’ve had two contractors come out who are putting together actual hard numbers. I have NO idea what they’ll come back with – seriously no clue. I thought I had an idea of what it would cost and so far that’s not panning out.

We would pay cash for this project so who knows if it will happen. At this point it’s looking like no. And the whole thought of my house being a total and complete disaster for weeks on end is starting to hit me too – I don’t know if I have it in me. :) For real.

Have you (or anyone you know) ever done a project like this? I’d love any advice. Was it astronomical? Was it worth it? Did you go rocking in a corner during the process?

If any local (Indy area) folks know of a reasonable contractor I’d love their name. Feel free to leave it in the comments or email me. I’m not going to get a ton of quotes but if someone has a great resource I’d love to check into it. And I’ll keep you updated on this and let you know what we decide of course! Right now it’s looking like it probably won’t happen but I refuse to give up just yet. :)

The family room sectional

First of all, THANKS for all the thoughts on the bathroom ideas I shared earlier this week! Many of you with multiple kids mentioned our type of bathroom is a Godsend, which I can totally get. And I was so excited so many of you mentioned the solar tube skylights – I’ve been wanting to put those in our master bathroom for YEARS. I didn’t even think of them for that room so I’ll have to compare the costs of doing that and the window. And for some reason I thought you had to get them online but I saw them at Lowe’s yesterday – I’m so happy to hear they’ve worked well for so many of you!

OK, next topic. :) I mentioned in the paint colors post that question I get the most is about the color of our family room. A pretty close second is about our sectional we purchased a few years ago:

sectional sofa

This is it for “real” – pillows smushed and back cushions smashed.

We got this sofa three years ago after paying off our massive debt. It was our first big purchase that we paid cash for and it was a GREAT feeling. I searched for months to find the right, quality sectional that would fit this room. We ended up with the Lansbury sectional from Arhaus and we LOVE IT. It rocks my world, still.

Many have asked how it’s held up and how the cushions do and that photo above shows that, yes, the back cushions do get smashed:

Mostly totally because of this guy:

It’s rare that he sleeps ON the seat cushions and not the back.

As you can see above they do get pushed out of shape:

fluffing up couch cushions

But thankfully it only takes a few minutes to get them looking good again. I LOVE this about this sofa.

I just put them on the floor and push my fists around on them to get them fluffed up again:

fluffing up couch cushions

I work the filling back into the areas that need it. It takes less than a minute to get each one fluffed up again. And honestly, I rarely do this. That level of smush is from about six months of the dog and cats walking and laying on the backs of the sofa. So it’s not something I do often.

I am also in love with the fabric that we picked. I shied away from micro fabric, but when we were searching so many of you talked about how much you loved it. Our sofa is covered in micro denier, which is slightly different: micro denier fabric

I’m not sure exactly what the technical differences are but I’ve noticed two differences as far as using it – it’s incredibly soft, seriously like bunny butt soft. And it doesn’t leave quite the shadows that the micro fabric does. You know, the light and dark when you wipe your hand over it?

But this stuff is very much like microfiber in that it cleans up incredibly well. Every few months or so I’ll take a wet rag and just scrub any spots I see and they disappear. Here’s some frosting that I found, and how it looked right after I wiped it off:

 micro denier fabric micro denier fabric   

I never use any cleaners or chemicals on it – there’s just no need. Plain water gets everything out. (Although I have had it cleaned a couple times when we’ve had the carpets done over the years.) We’ve not had any major spills like red wine, so I can’t speak to that. But liquids do tend to bead up and not soak in, so that helps.

Also, our dog will occasionally “dig” at the cushions and so far we haven’t seen any damage from that. Also, the cats claws haven’t caused any issues either. It really is an incredible fabric and I would highly recommend it if you have animals or kids!

So after about five minutes of punching and rolling the stuffing in the back cushions, they’re back to looking brand new again:

small sectional

This sectional was probably our biggest furniture purchase ever – well, it was for one item. We spent just as much for a sofa and love seat (that obviously offer a bit more seating), but this one is easily the best purchase we’ve ever made. It will stand the test of time, I have no doubt in my mind.

I wanted a quality piece that we wouldn’t have to change out for years and this is it:

arhaus sectional lansbury

When we were on the hunt for a new sectional many of you shared your experiences with different brands on this post – check out the comments for some helpful info! At the time I was looking into Pottery Barn and IKEA as well.

Do you have a sofa or sectional you love? Any you’ve had good or bad experiences with?