s

p

Evercoss A7E, Smartphone KitKat Harga Rp1 Jutaan

Evercoss A7E, Smartphone KitKat Harga Rp1 Jutaan


JAKARTA - Evercoss kini memiliki pabrik yang terletak di Semarang, Jawa Tengah. Pabrik tersebut memproduksi beberapa model handset, salah satunya Evercoss A7E yang hanya dibanderol Rp1 jutaan.

Handset yang mendukung fitur dual SIM itu tampil dengan OS Android 4.4 KitKat. Didukung dengan prosesor Quad Core 1.3GHz, smartphone dengan layar 4 inci (480 x 800 piksel) itu hadir dengan baterai 1.650 mAh.

Untuk harga Rp1 jutaan, Evercoss A7E tampil dengan spesifikasi yang cukup mumpuni dengan kamera belakang 8MP dan kamera depan 2MP. Kamera belakang dilengkapi dengan fitur autofocus.

Smartphone dengan RAM 512MB itu memiliki storage 4GB dan mendukung fitur penyimpanan eksternal. Terdapat konektivitas seperti bluetooth, WiFi, serta WiFi tethering.

Pabrik Evercoss yang bertempat di Semarang itu untuk tahap awal dibangun empat line yang sudah berhasil memproduksi smartphone A7A pada Agustus, tablet AT1A pada September 2014.

"Tahap awal sudah kami buktikan dengan memproduksi smartphone A7A, A7E, C5F, dan tablet AT1A," ungkap Mario Ekosuryo, manajer operasional PT Aries Indo Global. Pada 2015, Evercoss akan menggenjot kapasitas produksi yang lebih besar, targetnya satu juta unit per bulan.
(ahl)


Sumber

Cathy Sharon Tak Mau Banyak Menekan Anak

Cathy Sharon Tak Mau Banyak Menekan Anak


JAKARTA - Cathy Saron tidak ingin memaksakan anaknya untuk terjun di dunia hiburan kelak jika sudah besar nanti. Dia lebih memilih untuk bebaskan karier anak.

"Aku enggak mau jadi ibu yang suka nge-push anak. Kayaknya enggak enak juga ya kalau nge-push. Makanya aku coba enggak maksain, lebih bebasin dia saja sih mau ke arah mana. Kita tinggal bimbing," ujarnya saat ditemui di Grand Indonesia, Jakarta.

Kakak Julie Estelle ini ingin menjadi ibu yang terbaik untuk anaknya. Dia ingin memberikan arahan dan pendidikan sesuai keinginan sang buah hati.

"Enggak cuma karier dia tapi kita juga enggak mau jadi orangtua yang egois. Kita pengin nyekolahin dia di tempat yang dia memang inginkan, takutnya kalau dipaksa enggak baik juga hasilnya," tandasnya. (rik)
(nsa)


Sumber

Cara membuat Elemen Persis Di bawah Header

Menyimpan widget persis di bawah header

Untuk membuat kolom baru tidaklah sesulit yang anda bayangkan, anda hanya cukup menambahkan sedikit kode css serta HTML kedalam kode template anda. Belum tahu caranya? silahkan ikuti langkah berikut :

  1. Login ke blogger dengan ID anda.
  2. Klik Tata Letak.
  3. Klik tab Elemen Halaman. Perhatikan struktur layout template anda. Biasanya bagian header akan seperti ini :


    elemenheader
  4. Sekarang kita akan membuatkan sebuah kolom baru persis di bawah header. Siap? yuk mulai.
  5. Klik tab Edit HTML.
  6. Klik Tulisan Download Template Lengkap, silahkan di backup dulu (penting).
  7. Copy kode berikut, lalu paste di atas kode ]]></b:skin>

    #under_header{
    margin:10px 0;
    padding:1%;
    width:98%;
    }


  8. Cari kode yang mirip dengan kode di bawah ini :

    <div id='header-wrapper'> 
    <b:section class='header' id='header' maxwidget="1" showaddelement="no">
    <b:widget id='Header1' locked='true' title='test (Header)' type='Header'/>
    </b:section>
        </div>

  9. Copy kode berikut lalu paste persis di bawah kode tadi :

    <div id="under_header">
    <b:section class='header' id='underheader' preferred='yes'/>
    </div>


  10. Klik tombol SIMPAN TEMPLATE. Tunggu beberapa saat sampai template anda tersimpan.
  11. Klik tab Elemen Halaman. dan struktur layout anda akan menjadi seperti ini.

    kolom-header
  12. Yihaa! sekarang anda sudah mempunyai elemen yang langsung persis di bawah header, silahkan tambahkan elemen yang  inginkan. Mau pasang iklan google adsense, klik saya.com atau apa saja atau mungkin mau pasang photo anda yang ganteng serta cantik di sana? silahkan wong blog anda.
  13. Selesai.


Kode-kode yang saya tuliskan di atas tentunya tidaklah mutlak, itu hanya kode paling sederhana yang saya buat untuk membuat tutorial “Cara membuat Elemen Persis Di bawah Header ” Semoga bermanfaat.

How to Automatically Create WordPress Post from YouTube Video


Follow WPBeginner on YouTube
How to Automatically Create WordPress Post from YouTube Video
Recently one of our users asked us for a way to automate the process of creating a new post in WordPress whenever they upload a new video on their YouTube channel. Adding a YouTube video in WordPress is extremely simple, but it requires you to manually log in, create a post, and then embed the video. In this article, we will show you how to automatically create new WordPress post whenever a YouTube video is uploaded.
We will use a free tool called IFTTT to do this.

What is IFTTT?

IFTTT stands for “if this then that”. It is a powerful service that lets you automate certain tasks based on your specified criteria. For example:
If this happens: ‘A new video is uploaded to YouTube’.
Then do that: ‘Create new post in WordPress’.
The example above is called a recipe. You can create a recipe for many web based services. Check out our article on how to automate WordPress and social media with IFTTT for more examples.

Creating YouTube to WordPress Recipe in IFTTT

First thing you need to do is go to IFTTT website and sign up (it’s free).
Once you are logged in, you need to click on the Create button to start creating your first recipe.
Creating a new recipe in IFTTT
This will bring you to the create a recipe wizard. You need to choose a trigger by clicking on ‘this’ link.

The fireplace design

Hello everybody! I’m back home sweet home after being away in Atlanta last week. Another successful Haven Conference is in the books!! Thanks to all of you who attended and all of our vendors and sponsors who help to make it a success! Every year I leave feeling so humbled and blessed. I came home and crashed hard – and then my boy got sick so we’re still nursing his bug. Back to normal! :)

Today I’m sharing the process I went through to decide on our new fireplace design. THIS is the fun part for sure. Usually I’d spend months pouring over photos to figure out exactly what I wanted, but this time I had to hurry it up a bit. The fireplace happened a lot faster than I thought it would because we had to have that figured out to move the gas line and lights.

Thankfully that built was the majority of the cost in this project – from here on out it’s not too bad. And even though I had to hurry up my normal process, I’ve known what my “dream” fireplace looks like for years anyway. ;) I just wanted to find some pics to show the guys.

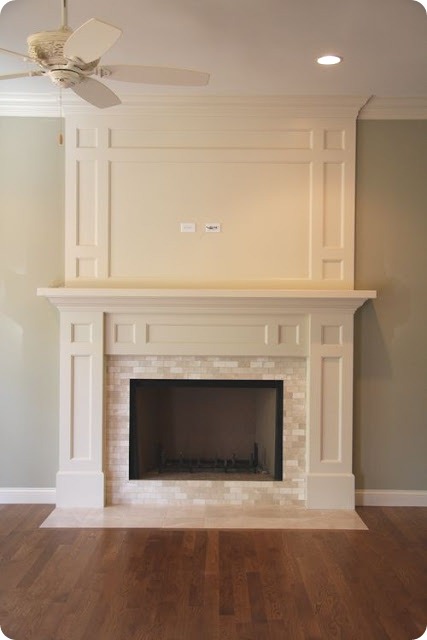
There were a couple things I was considering to change up the look even more. I love the look of a grand fireplace and as I was looking through inspiration photos I noticed that the ones that really struck me had two things – a hearth of some kind and they were raised up off the floor a bit.

Our fp has always been down to the floor and has never had a hearth:

mantel-christmas

I’ve always thought raising up the box and adding a hearth would make it feel grander, but I wasn’t sure I’d be able to do either one. I started doing some research to see if it was something I REALLY wanted to make happen.

This was my original inspiration:
raised fireplace on hearth

It had both – the fireplace itself was raised up a bit and there was a flat hearth. I’ve always thought both things make it feel more substantial.

But then the more I looked at photos, the more I realized most of the ones I was drawn to may have have had one of those features, but rarely both. Kelly’s gorgeous fireplace had a hearth but the actual fireplace was to the ground (because it’s wood burning):

woodburning fireplace, hearth

(source)

Layla’s beautiful fireplace redo had a simple black hearth and another fireplace that was low to the ground:

lettered cottage fireplace redo (source)

Again, their’s was low because there was a cast iron firebox inside initially, but I did like the look.

I finally found a gas insert that had a small hearth and was down low too:

TV over fireplace

(source)

The more I looked the more I realized maybe a raised insert and big hearth wasn’t the look I was going for. ;) And then as things started to come together I noticed that adding a tiled hearth was going to eat into our family room space even more. I’ve mentioned that the new room will be much bigger, but it will be long and skinny. That width the hearth would take up is valuable space.

And I looked into raising the gas insert but there were two issues – the venting in the back would have to be replaced and it would mean the whole thing would stick out even more. I mean, it’s already a beast. And we’re moving our TV over the fireplace so even another four to five inches in height would make our TV really high. As it is now I think it will be great, but any more and it would be awkward.

So after a little more research I decided to nix both. The added cost and problems weren’t worth it. I felt a ton better about that decision after seeing this gorgeous fireplace redo:

TV over fireplace

(source)

No hearth and the insert is to the ground – and it’s beautiful.

And when I found this one I saved it to my files and named it “exactly.”:

TV inset over fireplace, no hearth

(source)

This is actually very similar to how ours will look, at least the fireplace and wall part above. I’ve been planning to “sink” the TV in just a bit and this gave me a good idea of how it will look. My plan is that you won’t see that inset part though – the bracket will go inside and the TV will sit over it:

inset for TV bracket

As a reminder, here’s my inspiration for the look of the built ins and fireplace set up:

fireplace with built ins

And this is what they had done as of early last week:

fireplace with built ins

Lots of progress has happened since!

This week I’ll start caulking, filling and priming the entire thing. I still have to figure out what tile I want to use on the surround:

Those are just a few options – the first and third from the left are my favorites but that herringbone looks hard to install – lots of little bitty cuts that I’m not sure I want to attempt. It would look AMAZING though, right?

Anyway, I hope by the end of this week I’ll have the whole thing at least primed. Can’t wait to show you the progress! We’re almost to the point where it’s all up to me – the guys are finishing up the fireplace details today, working on the lighting in the room and then the audio/visual guys are coming to move everything. I’m a little nervous about that – hope it all goes smoothly. Then the floors can be patched and I can get moving on the walls and paint.

So far so good – I’m doing OK with the mess so far. Since there’s not really much left for the contractors to do I can see the light. :) I think we’ll only have another week or so of construction and then the smaller stuff starts.

Do you have a dream fireplace in your head? I’m so excited I get to see mine come to life!!